# NPH Prediction
## NPH Prediction
### NPH Prediction using 3D UNET
**Overview**
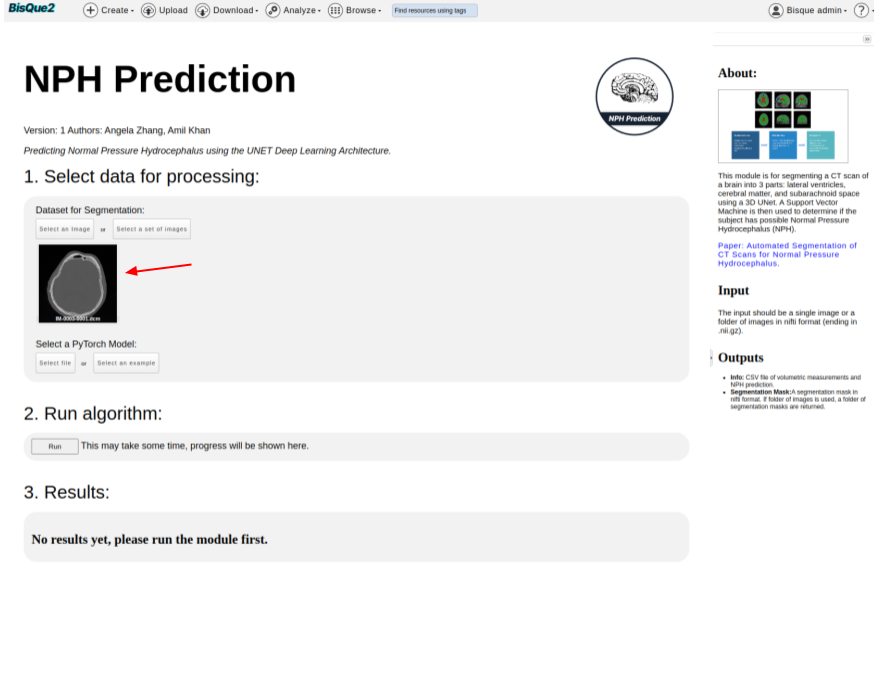
This module is for segmenting a CT scan of a brain into 3 parts: lateral ventricles, cerebral matter, and subarachnoid space using a 3D UNet. A Support Vector Machine is then used to determine if the subject has possible Normal Pressure Hydrocephalus (NPH).
**How to Run NPH Prediction Module:**
#### STEP 1. Login
From the [BisQue Homepage](https://bisque2.ece.ucsb.edu/), the top right-hand corner has the **Sign In** button.
If you do not have an account, you can create one. If you already have an account, login using your credentials.
#### STEP 2. Upload Image(s)
BisQue supports many of the popular medical imaging file formats, i.e. `NIFTI`, `DICOM`. We will cover two of them here.
**Upload `NIFTI`**
Once logged in successfully, you will see **Upload** in the top menu bar. Click on **Upload** and feel free to **Drag-and-Drop** files or Select **Choose Files** or **Choose Directory**. Navigate to the `NIFTI` files on your computer and select the ones you want to upload, either individual files or an entire folder/directory.
{% hint style="info" %}
**File Formats**
The supported `NIFTI` file types should end with `.nii` or `.nii.gz`
{% endhint %}
**Example**
```
CT35000.nii.gz
CT36000.nii
YOUR-FILENAME.nii.gz
```
**Upload `DICOM`**
Once logged in successfully, you will see **Upload** in the top menu bar. Click on **Upload** and feel free to **Drag-and-Drop** files or Select **Choose Files** or **Choose Directory**.
{% hint style="warning" %}
**WARNING: DICOM FILES MUST BE ZIPPED!**
Before uploading your folder of `DICOM` files, make sure they are compressed/zipped. On Mac, two-finger click on the file and hit **Compress `YOUR-FOLDERNAME`**. This will zip the folder and allow you to upload that single zipped file to BisQue. *We currently do not support uploading the raw directory to BisQue.*
{% endhint %}
**Example**
Folder of Raw `DICOM`.
```
IM-0001-0001-0001.dcm
IM-0001-0001-0002.dcm
IM-0002-0001.dcm
IM-0002-0002.dcm
IM-0002-0003.dcm
IM-0002-0004.dcm
IM-0002-0005.dcm
IM-0002-0006.dcm
IM-0002-0007.dcm
IM-0002-0008.dcm
IM-0002-0009.dcm
IM-0002-0010.dcm
IM-0002-0011.dcm
IM-0002-0012.dcm
IM-0002-0013.dcm
[...]
```
Zip the folder containing these files and you are good to go!
Select the option that says **Several DICOM files in a package (unpack and inspect)**. BisQue will correctly parse the `DICOM` files and upload them as dataset if there are multiple images. After its uploaded, you can click on the **Blue Text** to be taken to your uploaded files.
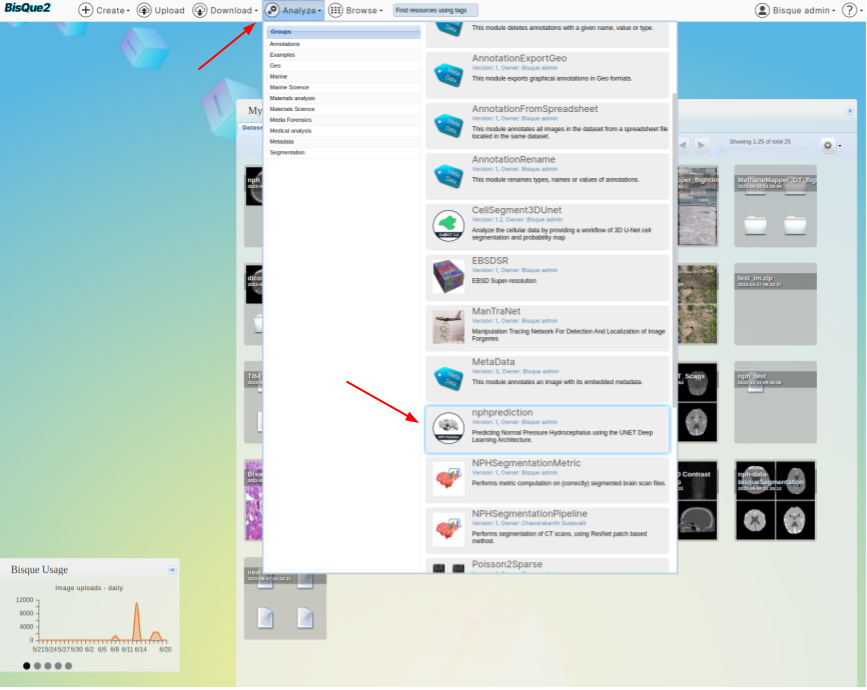
#### STEP 3. Go To NPH Prediction Module Homepage
Once you are logged in successfully, you can access the NPH Prediction module by [Clicking Here](https://bisque.ece.ucsb.edu/module_service/nphprediction/?wpublic=1) or by using the Menu bar at the top of the homepage.
> **From the Menu Bar.** Using the Menu bar at the top of the screen, go to `Analyze --> NPH Prediction`. You might have to scroll down a little bit since we are adding more modules.
>
>  #### STEP 4. Run NPH Prediction Module
Once on the NPH Prediction homepage,
* `Select an image` you uploaded.
* Click on `Select an Image` Button
* It should navigate you to `Resource Browser`, where you should be able to select an image that is uploaded.
* You should be able to see the selected image on the module page.
>
#### STEP 4. Run NPH Prediction Module
Once on the NPH Prediction homepage,
* `Select an image` you uploaded.
* Click on `Select an Image` Button
* It should navigate you to `Resource Browser`, where you should be able to select an image that is uploaded.
* You should be able to see the selected image on the module page.
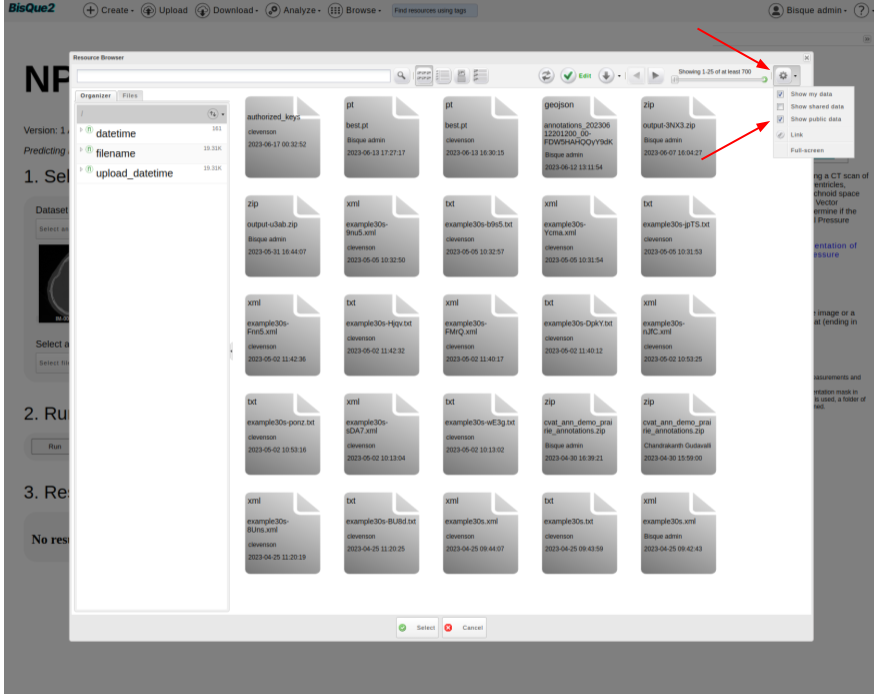
>  * Select a PyTorch Model, which is the magic box that is trained to predict the presence of NPH by looking at the input scan.
* Click on `Select file` button.
* Cick on `Gear Icon` on top right corner of `Resource Browser`. Tick the box that corresponds to `Show public data`.
>
* Select a PyTorch Model, which is the magic box that is trained to predict the presence of NPH by looking at the input scan.
* Click on `Select file` button.
* Cick on `Gear Icon` on top right corner of `Resource Browser`. Tick the box that corresponds to `Show public data`.
>  * In the search bar, type `filename:*_epoch200.pt` and hit Enter. This should filter out the required pytorch files. Now, select the first model in the list and hit `Select`.
>
* In the search bar, type `filename:*_epoch200.pt` and hit Enter. This should filter out the required pytorch files. Now, select the first model in the list and hit `Select`.
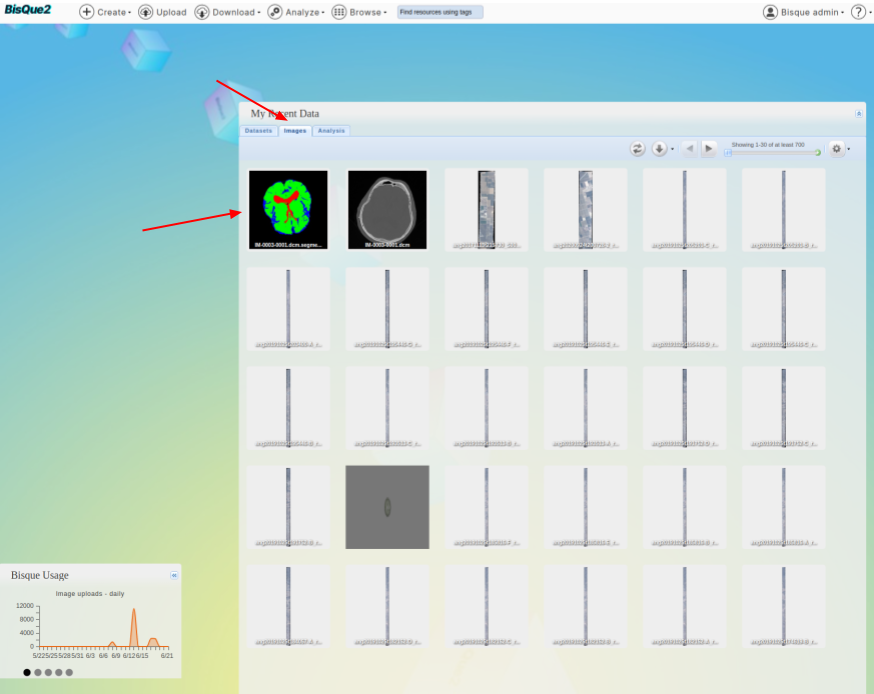
>  * Hit `RUN` Button.
* It is expected to take around 60 seconds to 300 seconds of runtime, depending upon the input file size, cluster compute availability, and various other factors.
* Visualize the `Results`
>
* Hit `RUN` Button.
* It is expected to take around 60 seconds to 300 seconds of runtime, depending upon the input file size, cluster compute availability, and various other factors.
* Visualize the `Results`
>  * Instead of an image, one can also run the module on `dataset` of images.
* Users just need to upload the images to `dataset`.
* That `dataset` can be used as an input.
* Users need to just click on `Select a set of images` intead of `Select an image` button.
## Mask Editing
BisQue can also let users make **corrections** to masks predicted by the NPH model.
In this user manual, we present a toy example illustrating how one can make edits to the predicted mask.
#### Step A: Open Predicted Mask
* Go to [Bique home page](https://bisque2.ece.ucsb.edu/client_service) and click on images
* Select the mask that was generated recently.
>
* Instead of an image, one can also run the module on `dataset` of images.
* Users just need to upload the images to `dataset`.
* That `dataset` can be used as an input.
* Users need to just click on `Select a set of images` intead of `Select an image` button.
## Mask Editing
BisQue can also let users make **corrections** to masks predicted by the NPH model.
In this user manual, we present a toy example illustrating how one can make edits to the predicted mask.
#### Step A: Open Predicted Mask
* Go to [Bique home page](https://bisque2.ece.ucsb.edu/client_service) and click on images
* Select the mask that was generated recently.
>  * You should see a mask editor button at the top.
>
* You should see a mask editor button at the top.
> 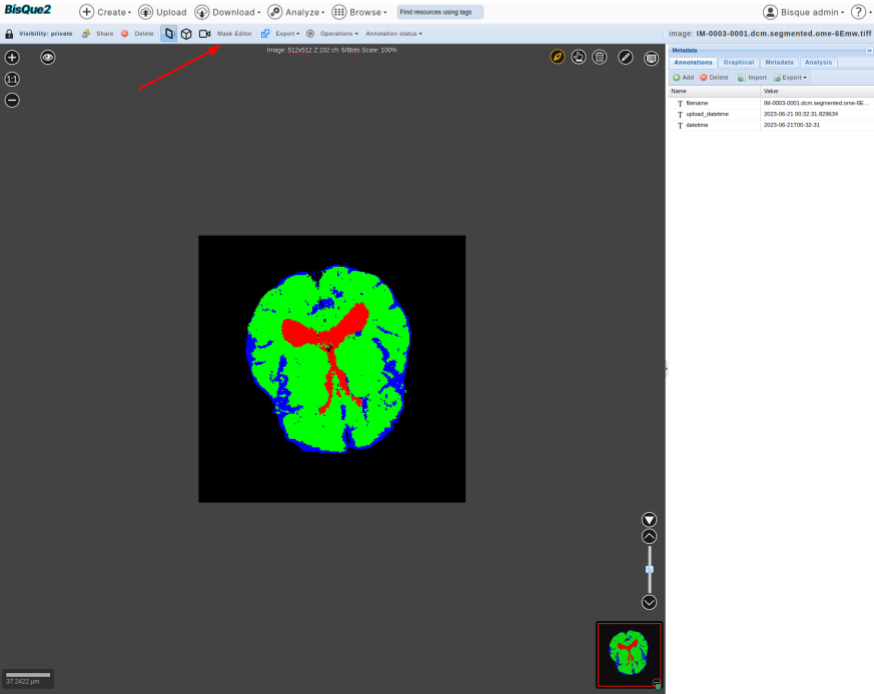 * Click on that button. This should enable you to edit the mask.
* As a fun example, you can go to slice-3 and draw “three” on it. You can save the edited mask.
>
* Click on that button. This should enable you to edit the mask.
* As a fun example, you can go to slice-3 and draw “three” on it. You can save the edited mask.
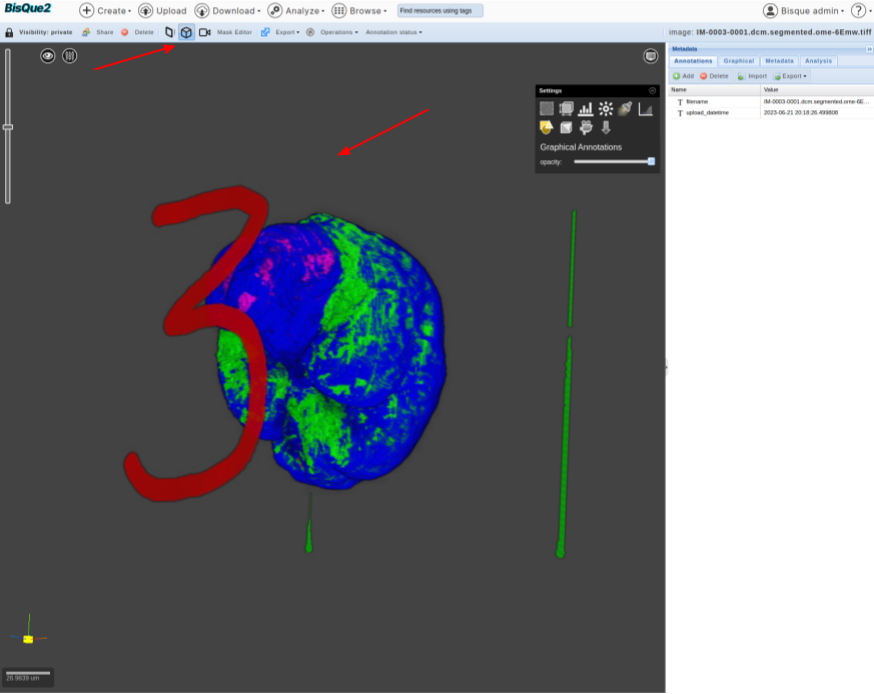
> 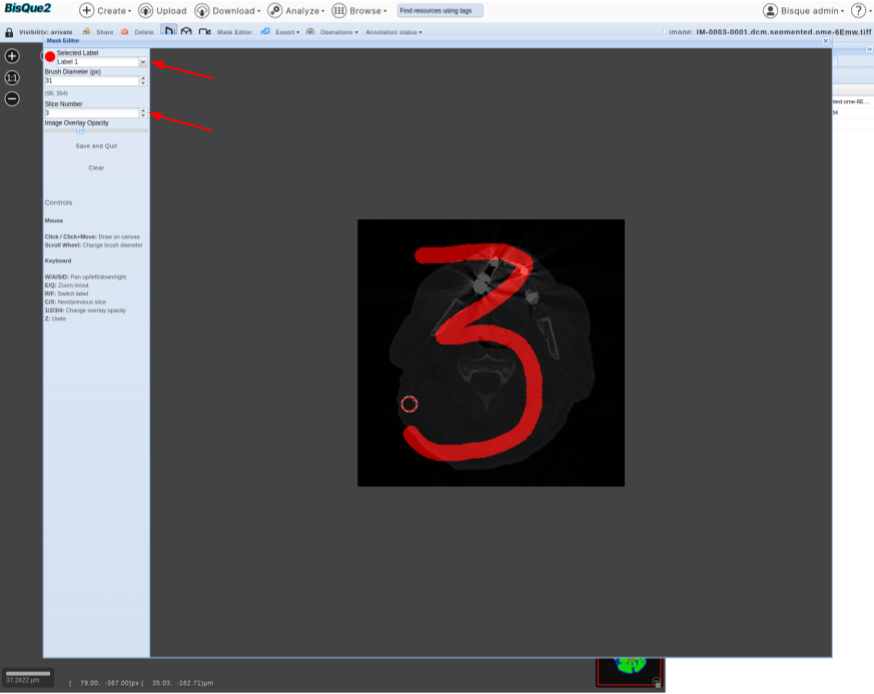 * Click on “Save and Quit” Button. The edited mask should be saved on bisque (with a name that is different from the original mask). Users might have to wait for **20 seconds** and edited mask (with modified name) should be displayed on the screen.
* One can click on the 3D-Viewer and verify the edits (in this case).
>
* Click on “Save and Quit” Button. The edited mask should be saved on bisque (with a name that is different from the original mask). Users might have to wait for **20 seconds** and edited mask (with modified name) should be displayed on the screen.
* One can click on the 3D-Viewer and verify the edits (in this case).
>  * Happy Editing!